
When I started stamping I bought and stuck with sentiments because was afraid of images with people or animals. I had a fear of coloring those images and them not turning out “right”. As I have progressed in my stamping skills, I have learned to try new things and broaden my horizons! However, my love for short and sweet sentiments makes sure that I keep those stamps close at hand!
Aside from the usually stamping sentiments onto cards and such, I love to use sentiments added to handmade embellishments to add a bit more to my cards and scrap layouts! It’s a great way to get so much more out of that sentiment stamp you have just sitting there and adds detail, character, and your own personal touch to a card or layout. Today I am going to show you how to make some great little fan flower sentiments for your next project! Be sure and read to the end for a sweet little giveaway!
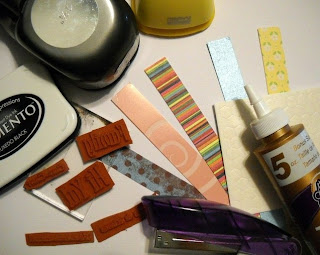
First, gather all the supplies you will need for the project. Choose your sentiment stamps. Rubber Romance has some great sweet sentiments that are the perfect size for these type of embellishments! You will also need, your ink pad, glue, round and/or scalloped paper punch, adhesive dimensional, stapler, and your paper of choice. I have 5, ¾ inch strips, of 12 inch paper I pre cut with my trimmer.
Aside from the usually stamping sentiments onto cards and such, I love to use sentiments added to handmade embellishments to add a bit more to my cards and scrap layouts! It’s a great way to get so much more out of that sentiment stamp you have just sitting there and adds detail, character, and your own personal touch to a card or layout. Today I am going to show you how to make some great little fan flower sentiments for your next project! Be sure and read to the end for a sweet little giveaway!
First, gather all the supplies you will need for the project. Choose your sentiment stamps. Rubber Romance has some great sweet sentiments that are the perfect size for these type of embellishments! You will also need, your ink pad, glue, round and/or scalloped paper punch, adhesive dimensional, stapler, and your paper of choice. I have 5, ¾ inch strips, of 12 inch paper I pre cut with my trimmer.
 Second, stamp your images on the paper you have chosen and punch them out and trim them to the size you want. After you have punched the sentiments, punch out 5 circles to use as the backs of the flowers. These can be from plain white cardstock as you will not see them.

Third, fold one strip back and forth into an accordion like pattern.

When it is all folded squeeze it all together in your fingers to help it hold its shape.

Next you will staple the two ends together as best you can as the ends sometime make it tricky!


You can now lay that part down and get one of your circles you punched for the backs and apply a large dollop of glue to the circle.

Then you will take the folded paper and push the inside corners down into the center of the circle into the glue. Work with it for a minute as you will need to position and hold carefully. When all the edges are down, you will see the shape of the flower .
 Place something heavy, in my case I used a full glue bottle, on top of the flower to hold it into place as the glue dries.
  After the glue has dried, use an adhesive dimensional to adhere your sentiment to your flower.
A peak at the backside:

Place on a card or layout of your choice for a unique, dimensional look!

And now for the giveaway part- become a follower of Rubber Romance Stamps Blog and comment on this post for a chance to win 3 of these sentiment embellishments I have made. I’ll happily send them on their way to one of you guys for helping us spread the word about Rubber Romance Stamps. Post about this tutorial or any of the great tutorials from the amazing DT girls, with a link back to this blog and you will be entered twice more! (Leave us a comment on where to see your post!)

Thank you so much! These step by step instructions are great! I cannot wait to try this.
ReplyDeletelove these embellies, Sammye Jo!! so cute :)
ReplyDeleteVery cute Sammye Jo! Great tutorial.
ReplyDeletelove the tute sammye jo, very cool - i am definitely going to try this :D
ReplyDeleteGreat way to use the sentiments along with the fan flowers. Thank you for a great tutorial.
ReplyDeleteGreat tut on making that adorable embellie! Easy to follow... so maybe I can do this!
ReplyDeleteFun flower, adorable!
ReplyDeleteVery neat!
ReplyDeleteInformative blog!!! The ideas and daily life practices have been demonstrated. I lie it. The afraid factor for coloring animal or people images is quite astonishing.
ReplyDelete