Friday, October 30, 2009

Romantic Tutorial- Coloring your Rubber Romance Images

One thing about Rubber Romance images is that most of them require coloring. I know a lot of stampers use Copics to color images but if you are like me, those just aren't in the budget at this point. I am going to show you is how to use Prismacolor Pencils with Odorless Mineral spirits to color your images. This way you can have coloring and shading at a fraction of the cost of Copic markers. I was able to find the 120ct. set at my local craft store and used a 50% off coupon. It is one of the best investments I have made for crafting.

Supplies Needed:
Prismacolor Pencils
Odorless Mineral Spirits (OMS,artist grade)
Paper Blending Stumps (the ones made in Taiwan are the best)
File or sanding block
A Good Permanent Ink that will not bleed (recommended Memento Ink)
Good quality cardstock

First, Stamp your image. If you are using Memento ink, there is no need to let it dry- it is ready immediately for coloring. I am using my all-time favorite Rubber Romance Image. I love this Martini Girl!

Next choose a color and start coloring. For best results in shading keep your color to the outer edges of the image

Next, take your blending stump and dip and soak the end with OMS. Use the blending stump to pull the color from the edges towards the middle using circular motion for best results.


When you are done blending this is what it will look like. You can do more or less depending on your desired result.

Continue to use the same technique on the rest of the image. *** Make sure you file the blending stump between colors to prevent mixing of colors.


Here is the image colored and blended.

Now you can add fun accents to make your image more unique. I chose to add Stickles to the earrings and Crystal Effects to her lips to look like lip gloss. :)

Now my image is ready to be added to my project. I hope I inspired you to try something new today! Be sure to be on the lookout for my finished project on my blog.

Thanks! Sherry Campbell- Rubber Romance DT Member. :)

Monday, October 26, 2009

Cute Stamped Canvas Bag

My daughter is in her first year of Brownies. At her first meeting, she came home with this cute little canvas bag. Her assignment was to decorate the bag that would be used at each meeting. I was so excited. I told her we would get out the stamps and make a fun creation! Here is what we came up with:The bag was super easy and fun to make. First we took our Rubber Romance "Fashionesta" stamp and brown Staz-on ink. We stamped all over the canvas bag.We even stamped the straps. It was so fun working with my daughter too! Next we added a sheer brown ribbon to one of the straps. Finally we added 2 silk flowers with a large brad. My daughter couldn't wait to put it on and show it off!
These would make such cute favor bags for girls birthday parties!

Friday, October 23, 2009

Tutorial - Stamping on a Candle

Happy Friday!!!!!! I have a fun technique to share with you today....stamping on candles. It's super easy and makes a great gift for any occassion.

You'll need......
Your favorite Rubber Romance stamp....here I used Denise has a Birthday
Candle
Tissue Paper
Wax Paper
Black Ink
Coloring medium....here I used Copic Markers
Heat Gun
Embellishments

I start by stamping my image in black ink onto the tissue paper. I then colored her with Copic Markers. Make sure you have a piece of paper under the tissue paper to absorb the bleed thru.
Then, you cut out the image as close as possible.
Next, grab your candle and lay your cut out image onto it.
Wrap the wax paper over the image and around the candle creating a handle in the back for you to hold onto. Using your heat gun, heat the wax paper over where the image is. The area will turn shiny and the tissue paper will disappear once the wax adheres to the candle.
Here's what the candle looks like once the image is adhered.
To finish the project, I stamped "Birthday Diva" onto some ribbon using Staz-On ink and wrapped it around the bottom of the candle adhering it to the back using a brad than I pressed into the candle.
I hope you'll make your own candle for your next handmade gift!!!!
Happy Stamping,
Shannon

Tuesday, October 20, 2009

Oct 20th - Card sketch Challenge


Here's your card sketch for Octo 20th, made by the fabulous Julie!


and here's my take on it!


Here are the rules:

-Complete a card by Nov 9th at midnight eastern with this sketch, and Rubber Romance stamps for your chance to win a great Rubber Romance prize.
-Post your card on your blog or public gallery and link it here, using the Mr Linky below.
-Please link to your actual post and not your entire blog.

A winner....

A winner has been drawn for our Sept 20th Card Sketch Challenge and it is....


Christi Snow
http://alteredambitions.blogspot.com/2009/09/final-day-of-sketchfest.html

Please contact myself or Robin with your mailing address, congrats!
Stay tuned for Oct 20th Card Sketch Challenge!

Diva Wine Charms Tutorial

If you've ever visited my blog or know me personally, you'll know that wine is one of my loves! I enjoy a glass of red wine many nights while I'm stamping. I often give wine as gifts when I go to dinner somewhere, also. When I have girlfriends over or have parties, wine is always served. One problem we always come across; which glass is mine? Wine charms are the perfect answer to this. I'm going to show you how to make your own wine charms with a few readily available craft items. These make great hostess gifts, along with a bottle of wine. Make some now and you'll be all ready for the holidays!

Here you can see how the charm looks on the stem of a wine glass. For non wine drinkers, they can be used on the handles of mugs, too.

You'll need shrink plastic to get started. Cut your shrink plastic to the desired shape. I used my circle shaped nestabilities to cut the plastic. Scissors work fine also.

Next, stamp your images onto the rough side of the shrink plastic. I find Staz-on ink works best for this. The up close image uses Wendy, one of the Rubber Romance Divas. The other Divas I used for this set of charms include: Babs, Diva Artist, Diva Chef, Lulu, and Jane. You can check out the Rubber Romance Divas here. The Divas are perfect for this project, they make such fun and sassy wine charms. Your girlfriends will love picking out a charm to use, that most closely represents them.

After stamping your images, color them in. You color on the rough side of the shrink plastic. I used Prisma color pencils and Sakura stardust pens for my coloring.

Punch a hole in the plastic before shrinking. Shrink them according to package instructions. I like to do mine in the oven, but you can also use a heat tool. Don't walk away from the oven, they shrink pretty fast. Don't worry if they look all curled up, they will flatten out, just give them a little more time.

This is how they look after shrinking. They shrink to about one quarter of the original size.

Add a jump ring to the pre-punched hole in each charm. Jump rings are found in the jewelry making section of craft stores.

Thread the charm and some beads on a wire hoop earring. Here is the whole set together. I usually make six or eight as a set.

I tie a ribbon through all of them to hold them together, then on to packaging.

I packaged mine in a little cello bag with a topper. I computer generated the words, so the recipient would immediately know what they were. Added some prima flowers and bling for sparkle.

Thanks for stopping by today. Hope you enjoyed this little tutorial and will try it out!

Friday, October 16, 2009

Tutorial - Solid Image Stamping

When you have solid image stamps like the dress on Melanie the Shopper, you don't have to be limited to ink colors for your choices - you can still have patterns. How? Dye inks are slightly sheer. Choose a light color that will still show up over a subtly patterned print. Be sure to test it out on a scrap to make sure your ink will show up and that your print is not so busy that it overwhelms your image.


Here's a close up of Melanie:


The pink actually doesn't look all that hot on the slightly gray-ish background like that. But after you cut the solid parts out and piece your image - its really pretty...


Its still a little "floaty" on the edges so outline with a black pen to confine it a bit


Then make up your card like always....


Enjoy. Wendy

Monday, October 12, 2009

Creating Clouds

A background pattern can add a lot to your stamped image. One of my favorite techniques is creating clouds with either a stipple brush, an ink blending tool or an airbrush:

Step 1) Cut clouds out of cardstock to use as your masks.


Step 2: Place your mask on your background and use your tool of choice to apply ink above, and to the sides of the cardstock mask


Step 3) Move your mask down and to the side and repeat until desired pattern is achieved


You can create similar clouds with other tools such as an ink blending tool:

or an airbrush (with COPIC markers)


I hope you'll try this technique on a card and pair it with a great Rubber Romance stamp! There are plenty that would be awesome such as Lets Walk the Baby, Tiffany in April Showers and Cutie Pie home Tweet Home (Pictured below)

Friday, October 9, 2009

Sketch Challenge - Oct 10


Here's your sketch for October 10th!! Winning is easy:
Complete a card by October 20th at midnight eastern with this card, and Rubber Romance stamps for your chance to win a great Rubber Romance prize.
Post your card on your blog or public gallery and link it here, using the Mr Linky below. Please link to your actual post and not your entire blog.


Here's my sample:


Turning Your Stamped Sentiments Into Something More!

When I started stamping I bought and stuck with sentiments because was afraid of images with people or animals. I had a fear of coloring those images and them not turning out “right”. As I have progressed in my stamping skills, I have learned to try new things and broaden my horizons! However, my love for short and sweet sentiments makes sure that I keep those stamps close at hand!
Aside from the usually stamping sentiments onto cards and such, I love to use sentiments added to handmade embellishments to add a bit more to my cards and scrap layouts! It’s a great way to get so much more out of that sentiment stamp you have just sitting there and adds detail, character, and your own personal touch to a card or layout. Today I am going to show you how to make some great little fan flower sentiments for your next project! Be sure and read to the end for a sweet little giveaway!
First, gather all the supplies you will need for the project. Choose your sentiment stamps. Rubber Romance has some great sweet sentiments that are the perfect size for these type of embellishments! You will also need, your ink pad, glue, round and/or scalloped paper punch, adhesive dimensional, stapler, and your paper of choice. I have 5, ¾ inch strips, of 12 inch paper I pre cut with my trimmer.
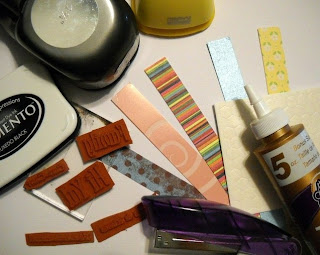
Second, stamp your images on the paper you have chosen and punch them out and trim them to the size you want. After you have punched the sentiments, punch out 5 circles to use as the backs of the flowers. These can be from plain white cardstock as you will not see them.

Third, fold one strip back and forth into an accordion like pattern.

When it is all folded squeeze it all together in your fingers to help it hold its shape.
Next you will staple the two ends together as best you can as the ends sometime make it tricky!
You can now lay that part down and get one of your circles you punched for the backs and apply a large dollop of glue to the circle.

Then you will take the folded paper and push the inside corners down into the center of the circle into the glue. Work with it for a minute as you will need to position and hold carefully. When all the edges are down, you will see the shape of the flower . Place something heavy, in my case I used a full glue bottle, on top of the flower to hold it into place as the glue dries. After the glue has dried, use an adhesive dimensional to adhere your sentiment to your flower.
A peak at the backside:

Place on a card or layout of your choice for a unique, dimensional look!

And now for the giveaway part- become a follower of Rubber Romance Stamps Blog and comment on this post for a chance to win 3 of these sentiment embellishments I have made. I’ll happily send them on their way to one of you guys for helping us spread the word about Rubber Romance Stamps. Post about this tutorial or any of the great tutorials from the amazing DT girls, with a link back to this blog and you will be entered twice more! (Leave us a comment on where to see your post!)